
Have you ever restored an implant where you said to yourself, I wish that implant were in a different position? In this issue of the Byte, I’ll use a case study to demonstrate how positioning of an implant directly affects the restorative outcome and why the restorative dentist should be the ultimate decider on where an implant lands. The case scenario I will use is retrospective, meaning the implant was already placed. However, these scenarios are often the best to learn from.
Patient A:
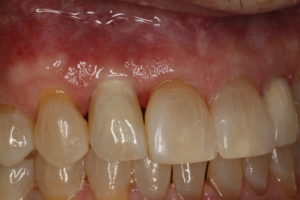
A healthy 54 year-old male was self- referred for restoration of his implant #10. The patient reported a dental history inclusive of orthodontics and peg lateral incisors #7 and 10, which had been restored with bonded restorations several years ago. Approximately 6 months prior, the patient reported fracturing the crown #10, and saw a surgeon for removal of the root #10 and implant placement. Here is his initial presentation:
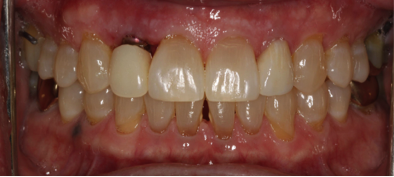
Fig 2. Interim RPD at initial visit
Items to take into consideration:
- moderate lip/smile line
- loss of the interproximal papilla #10
- gingival asymmetry of 7 and 10
The next step in his treatment was fabrication of a provisional restoration. Why make a provisional restoration?
- Patient comfort – The use of an interim removable prosthesis can be eliminated. Patients like getting rid of “flippers”!
- Tissue contouring – This is more important to the clinician than the patient
- Determination of the type of final restoration – What type of abutment and material will be used? Will the final crown be cemented or screw-retained?
Provisional implant restorations can be fabricated using several methods. Once his provisional was fabricated, it communicated where the screw access was located, as well as facial contours of the crown. The cast also communicated implant depth and facio-lingual position.
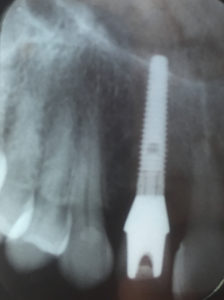
Fig. 3 Cast demonstrates implant screw access and depth
The implant was placed fairly deep as is seen on the cast. There was 6mm of tissue between the head of the implant and the facial gingival crest. In addition, the provisional indicates a facially inclined implant with the screw access through the facial-incisal edge. We can notice the moderate loss of interproximal papilla and gingival asymmetry
likely due to the depth of the implant.1 With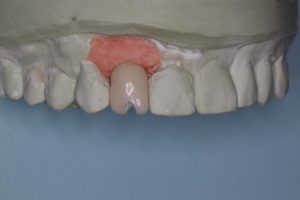 the information gained from the cast, I can make a decision on the type of final restoration to use in order to obtain as natural a result as possible. Facial screw access doesn’t eliminate a screw-retained restoration, but without additional measures it can compromise the esthetic outcome. Additionally, implant depth and the use of
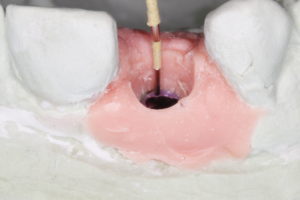
a cement-retained crown will require careful placement in order to minimize the chances of cement gaining access to unwelcomed areas.
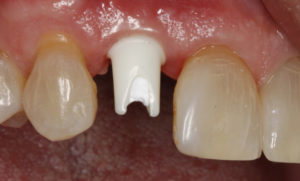
For this patient I used a custom zirconia abutment on a titanium base with a lithium disilicate cemented crown restoration. The zirconia abutment was designed for ideal margin placement at the gingival level.
Customization of the crown was performed and the crown was cemented with a translucent dual-cure resin cement following covering of the screw access.
Final cemented restoration using Zr abutment and Lithium disilicate restoration
Although the end result was acceptable there were things to be learned about implant position in this case. Here is what I would have considered during the planning phase and then communicated to the surgeon:
- Implant depth – Ideal placement should be 2.5-3.0mm apical to the desired gingival zenith. The numbers come from several authors1,2, and involve recreating a biologic width as well as allowing for sufficient room to develop restorative contours. If there is insufficient bone at this level (which a CBCT will help show) the decision must be made whether grafting will be necessary, or possibly an altered esthetic outcome as papilla will be compromised.
- Facial-lingual positioning – 2mm palatal to the desired gingival zenith is recommended. Several studies show the importance of this position for long-term stability of the facial bone. In addition, with screw-retained crowns coming into favor, this position is important so the restoring dentist has more control over the final restoration.
- Mesial–distal positioning – Ideally at least 1.5mm of bone between teeth and implants is recommended.
In Part 2, I will discuss how to best communicate your preferred implant position to your surgeon, or yourself, if you are placing implants. Although CAD/CAM fabricated guides have helped surgeons tremendously, the nitty-gritty details of implant positioning should be understood by all involved. As always, I welcome your referrals and am available to consult on patient cases.
Dr. Emily Batson is a native of Colorado Springs, CO. She is a graduate of Indiana University School of Dentistry, and served in the United States Army following dental school. She completed her specialty training in Prosthodontics at the University of North Carolina at Chapel Hill.
References:
- Choquet V. et al. Clinical and Radiographic Evaluation of the papilla level adjacent to single-tooth dental implants. A retrospective study in the maxillary anterior region. J Periodontology 2001; 72.
- Cooper LF, Pin-Harry O. “Rules of Six” – Diagnostic and Therapeutic Guidelines for Single-Tooth Implant Success. Comp Cont Dent Education. Feb 2013.