
“a unit of dental insight for the curious practitioner”
Emily R. Batson DDS, MS
The many ways of building bridges – Part 2
In my previous Byte I discussed several aspects in regards to designing fixed implant prostheses (FPD), or bridges. In this issue I will continue the discussion and focus on abutment selection, material selection, and impression techniques.
Engaging vs. Non-Engaging Abutments
The idea behind non-engaging abutments was developed as we started to use implants for prostheses that involved multiple teeth. For internal connection implants supporting single units an engaging portion is what gives the restoration its anti-rotation feature and solidifies the location of the abutment inside the implant. There are instances, however, when a screw-retained FPD is desired but implants are too divergent such that the internal aspect of the abutment will not seat. In these instances, a non-engaging abutment can be used on one or more of the implants to help with seating the restoration. These were very commonly used in cast-to FPDs prior to the improvements in abutment design through CAD/CAM technology. There are still instances today where this might come in handy, however keep in mind that reorienting a non-engaging abutment in the mouth can be problematic. Some implant companies make non-engaging final abutments that are intended to be placed once, prepared in the mouth, and then impressed like a tooth-borne restoration prior to delivering the final restoration. These can work very well, however, if the abutment ever comes loose or needs to be removed plan on at least a few extra minutes and maybe a little frustration reorienting the abutment.
Materials for Implant FPDs
The same types of materials utilized for tooth-borne restorations and single unit restorations can be used for implant FPDs.
- Metal-based restorations – these are still considered the gold standard, simply because the materials and methods are tried and true, as well as user friendly. One of the advantages is being able to add porcelain to interproximal contacts or occlusion if necessary. The downside can be costs involved in the fabrication. There are conventional methods that work well for these types of restorations however we have entered the era of computer designed frameworks that are then printed using a 3D printer and cast. Studies are up and coming on the quality of these restorations, but several show just as good fit and function as conventionally fabricated FPDs.
- Ceramic Restorations – the silicates and zirconia are our best options for ceramic FPDs. These can be either layered or monolithic in nature. Similar principles apply to these as metal-based FPDs, such that if contacts or occlusion need to be added it can be done so in the appropriate layering porcelain. One thing to note is the esthetic component for anterior FPDs. If using titanium abutments there may be show through of the gray from the abutment in a translucent material. Opaquing the abutments, or using a zirconia abutment may help with the esthetics. Making a provisional FPD prior to the final will likely help in determining the amount of room for the final restoration and demonstrate esthetic challenges you might be facing.
Impression Techniques for Implant FPDs
Open-tray and closed-tray impression components and methods are both acceptable for implant FPDs. Most studies show splinting open-tray impression components results in higher accuracy when the final restoration is planned as a splinted restoration or FPD. Again, if there are divergent implants, you might have to select non-engaging components, or place final abutments first before impressing for the FPD. The use of a provisional FPD can help in determining if there will be angulation issues for the FPD. Splinting can be accomplished very simply with floss and PMMA, or a light-cured resin material to bond the impression components together.
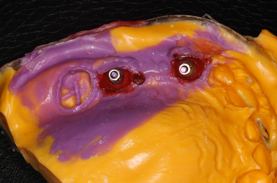
Fig 1. Pattern Resin was used to splint impression copings for an open-tray technique
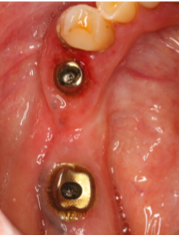
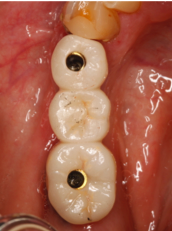
Fig. 2 and 3 – custom abutments supporting a screw-retained monolithic Zr FPD
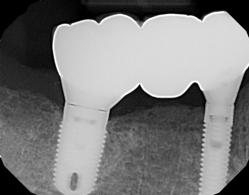
Fig 4. It is important to verify the fit both clinically and radiographically before and after insertion
There are several other variables that are important to consider with implant FPDs, including ideal location of implants and cementation protocols. Keep a list of each step involved with the planning and execution of your implant FPDs and you will likely find the steps easier to repeat and replicate.
I hope this Byte has given you a bit of helpful information. As always, I appreciate your referrals and am available to discuss any clinical scenarios you may have questions about. I can be reached by phone at 719-576-4247.
Dr. Emily Batson is a native of Colorado Springs, CO. She is a graduate of Indiana University School of Dentistry, and served in the United States Army Dental Corps. She completed her specialty training in Prosthodontics at the University of North Carolina at Chapel Hill. She maintains a full-time private practice limited to prosthodontics in Colorado Springs.
References:
- Tsagkalidis G, et al. “Accuracy of 3 Different Impression Techniques for Internal Connection Angulated Implants.” J Pros Dent 2015; 114(4); 517-23.
- Moreira AH, et al. “Accuracy Comparison of Implant Impression Techniques: A Systematic Review.” Clin Implant Dent Rel Research 2015; Supp 2; 751-64.