
There is increasing discussion about fabricating provisional implant restorations for patients undergoing implant therapy. Although the literature is replete with techniques, we frequently miss the “why” for these restorations. In this Byte I will review the most important reasons for fabricating provisional implant restorations and review a few techniques.
The Why
Whether restoring a single anterior implant or a full mouth of implants, provisional implant restorations can guide us in many ways. Let’s focus on four main reasons to fabricate implant provisionals.
- Patient rehabilitation
There are indications when immediately restoring implants is considered appropriate however the vast majority of implants require a healing period of 3-6 months. Even a short time in a provisional implant restoration allows for patients to gain a glimpse of their future restoration.
- Gain appropriate occlusion
This is an important aspect for us as well as the patient. Especially in the posterior region where it is frequent to find a molar or second molar as the final posterior stop, a provisional implant restoration can help as a guide to determining the appropriate vertical dimension of the restoration.
- Determine final restoration materials
We frequently find compromised scenarios that we may need to determine if a screw or cement retained restoration is appropriate. We also have certain dimensional parameters when using metal based or all ceramic restorations.
- Evaluate the esthetic outcome
This factor probably receives the most attention in our literature, and it is an important outcome, especially in the anterior region. Contouring soft tissues and determining screw access locations are two important aspects that can be learned from provisional implant restorations.
Techniques
Fabricating provisional implant restorations can be done in two fashions: directly or indirectly. Depending on the patient scenario and your comfort level both methods are acceptable. Materials and components needed for both techniques are very similar.
Chairside/Directly – the chairside method is best used for single unit restorations if time allows in your schedule. A vacuum formed clear matrix can be used to adapt the initial contours, while the final gingival contours are usually done outside the mouth. It is common in areas where tissue needs to be adapted for local anesthetic to be needed for patient comfort.
Lab/Indirectly – this method involves laboratory time, and may involve more than one appointment for the patient. CAD/CAM scanning can be utilized for the initial scan, or an impression with PVS or polyether. Either an open or closed tray impression coping can be used. One of the benefits of the indirect method is being able to shape the gingival contours ideally outside of the patient’s mouth by using a cast or scan. Polishing and finishing can be done prior to insertion, similar to a final restoration.
Fig. 1 PVS impression utilizing closed-tray copings to capture implant location
Fig. 2 Soft tissue moulage can be sculpted to ideal form
With both direct and indirect methods consider using temporary titanium cylinders for the provisional. Many companies sell less expensive plastic temporary copings however, these may not be as rigid as needed for areas that will be exposed to high occlusal forces, or where multiple splinted provisional restorations are needed. The titanium cylinders can be opaqued with a veneering material such as Anaxdent Anaxblend opaquer, or even a white flowable composite.
Fig 3. Titanium temporary cylinder- some implant companies provide the temporary screw with the cylinder
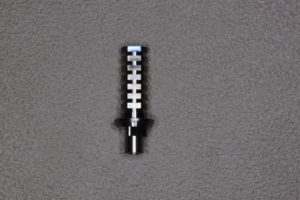
Fig. 4 Most temporary cylinders are made longer than needed. Save time by pre-cutting the cylinder.
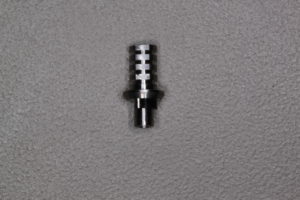
Fig 5. Opaquer added to titanium cylinder
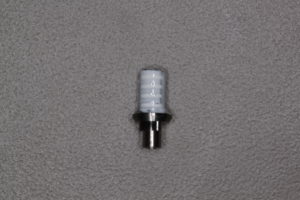
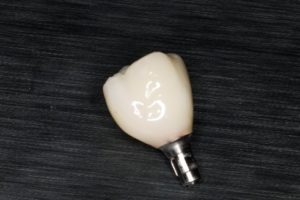
Fig 6. Provisional restoration made from bis-acryl Resin. Note gingival contours adapted to the temporary cylinder will aid in contouring the soft tissues.
Continuing on to the final restoration
How long is appropriate to keep a provisional implant restoration in place? This is a case dependent answer as some restorations will need to stay in place between 6-12 weeks to help contour healing tissues. If the main purpose of the provisional restoration is to contour tissues consider making a second final impression or scan to convey the tissue information to the laboratory.
As you may have surmised at this point the implant process can be lengthy for patients. If you feel an implant provisional needs to be part of the process it is better to advise patients of this upfront as well as to continue to remind them of the importance of the process.
How does one charge and get reimbursed for provisional implant restorations?
I consulted an insurance coding book, as several implant codes change from year to year. Although I am not an expert in dental insurance and am not an in-network provider for any insurance companies, these are the codes I could recommend using for provisional implant restorations.
D6051 – Interim Abutment
D6085 – Provisional Implant Crown
D6253 – Provisional Pontic (for implant FPDs)
Keep in mind that submitting any of these codes to the patient’s insurance may impact the amount paid on their final restoration. Convey the importance of a provisional restoration to your patient and decide on a fee based upon your time and the implant components you will need to order. Not every implant needs a provisional restoration, so case selection will be important ahead of time.
I hope this edition of the Byte has been insightful. I am always available by phone or email to discuss patient scenarios and welcome your patient referrals. I can be reached at 719-576-4247.
Dr. Emily Batson is a native of Colorado Springs, CO. She is a graduate of Indiana University School of Dentistry, and served in the United States Army following dental school. She completed her specialty training in Prosthodontics at the University of North Carolina at Chapel Hill and owns a private practice limited to prosthodontics in Colorado Springs, CO.